Monday 29 April 2013

EXAM PROJECT EVALUATION

The theme for the exam was 'Covert and Obscured'. At the beginning of the exam we looked at a variety of ideas and then began to pick out which ones we preferred and began to focus on those until we reached a final outcome idea.

Over the course of the exam my ideas have changed many times. Initially I wanted to focus on capturing graffiti artists on streets at night. This related well to the theme as it was both covert and obscured at the same time. However this was not possible as it was to narrow of an idea and wouldn't allow much place for improvement and development. 
I then decided that I would like to do something with obscuring faces by using make-up,face paints,mask etc. After shooting my first roll of film, the photographs of the ideas didn't come out quite as expected and I felt discouraged with the idea and decided to move on. After this I went on to looking at Sally Mann's work and I liked the idea of obscuring the body and hiding however this idea was short lived as I saw the work of Ron Gallela and really liked the paparazzi side. I then decided to shot a roll of film based on fake paparazzi and invading people's life. This related well to the theme, as I was being very 'covert' about how I took the photographs. After shooting the roll of film I was really pleased with how my photographs turned out, however I still didn't think that I had found my final outcome idea. That is then when I saw a random photograph on Getty Images of a man in business suit but his face was replaced by a fingerprint. This then got me thinking about criminals,murder scenes/cases and that was when I found my final outcome idea. It relates well with the theme as it shows obscurity of people and things aren't always what they appear to be.

Many photographers inspired as mentioned, Sally Mann and Ron Galella the most, even though I did not use them as my sole inspiration for my final outcome. I discovered a photographer named Melanie Pullen and she did an exhibition titled 'High fashion crime scenes'. Which I used as inspiration for some of my photographs, although she was taking photographs for the fashion side of things, I focused mainly on the composition of her models and their locations. Her photographs were quite minimalistic in objects as they were focusing more on the clothes, however mine are the opposite  despite that she was my main inspiration for my final outcome.

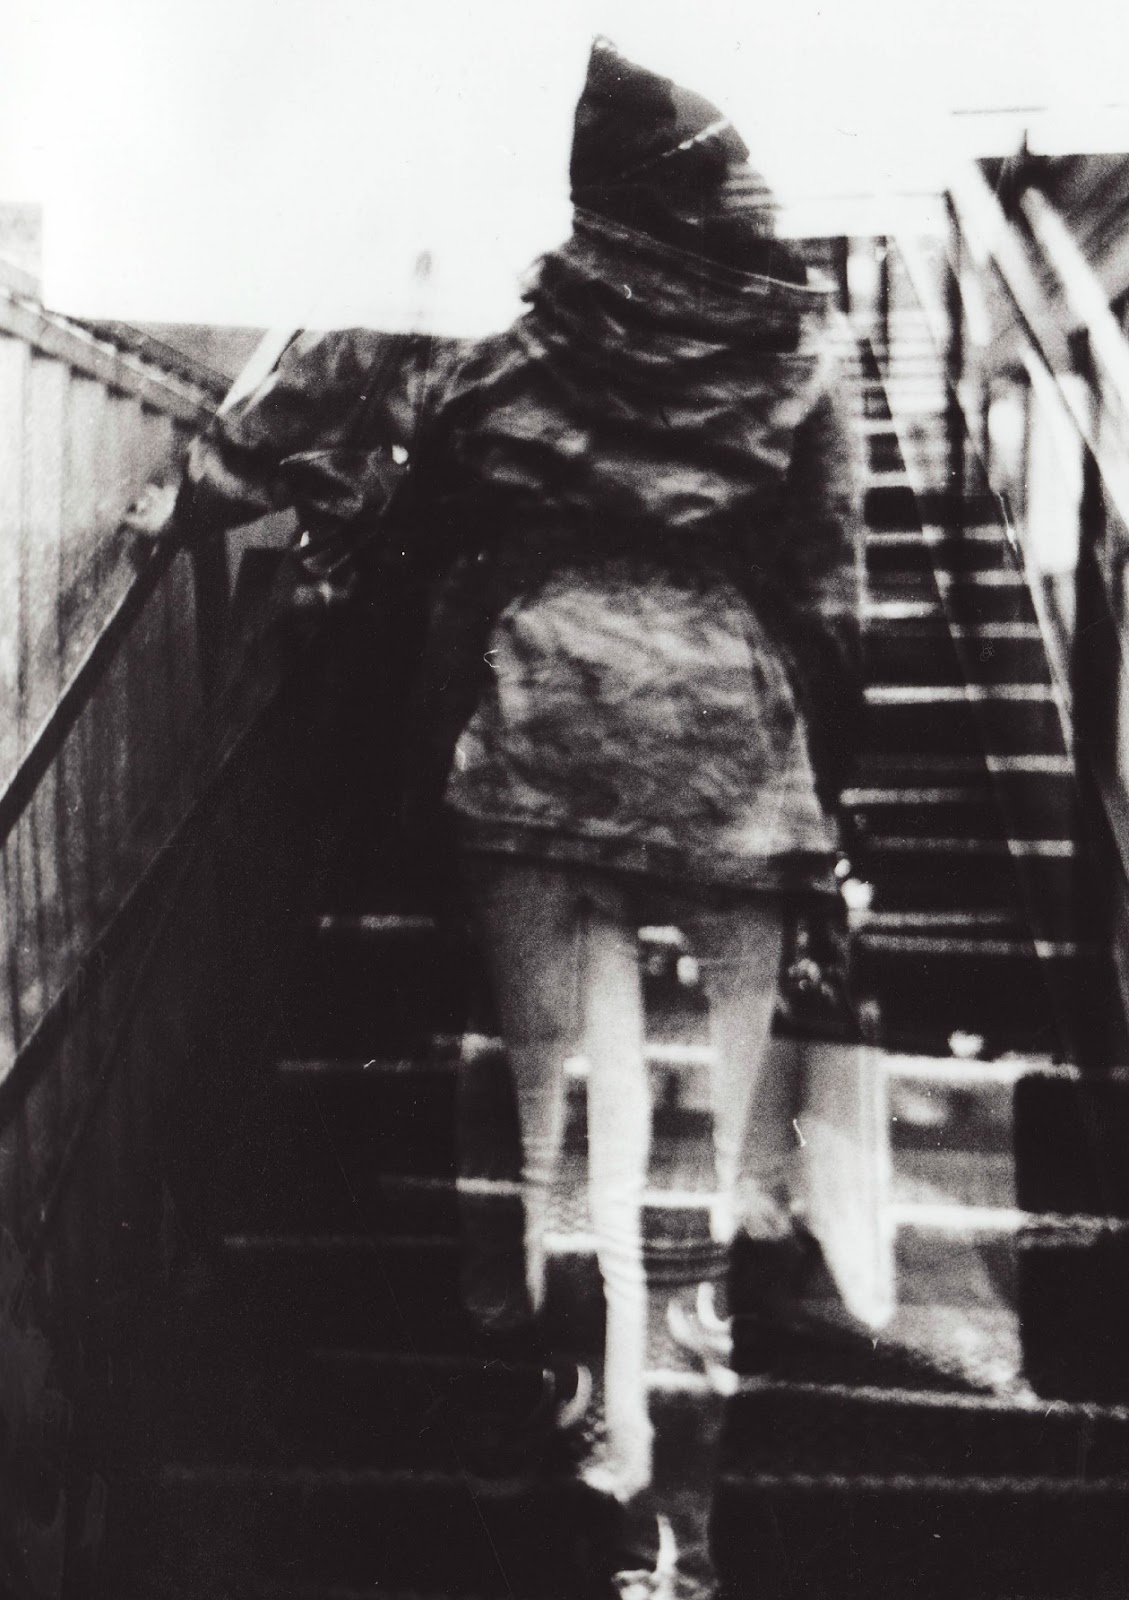
The experiments I have done through out the project helped me quite a bit for my final outcome. I used the collage experiment technique to do one of my final outcomes which was inspired by Lucas Simoes. I also used the double exposure technique to further improve one of my photographs. I also scratched onto one of my negatives which wasn't too good to give a more distressed affect.

To conclude I personally did not like the theme were given and I complained a lot during the start of the project. At the end of the project my feelings remain the same. I found the project at bit difficult as I did not like the given theme, I felt very limited to what I could and I felt that every idea I had chosen  there was never any room for development. And instead of having different and exciting set of prints, I would end up with identical prints which were uninspiring and boring. I think that I will be pleased when my final outcome is done, however I think that it will definitely not be one of my strongest works and won't showcase all of my abilities.

PHOTO PRESENTATION IDEAS


I will not be needing many materials since I am taking a simple approach and letting the image 'speak' for themselves. However I will be needing large black card, pins, string and tracing paper for my final outcome.

SIGMAR POLKE


This is a photograph done by Sigmar Polke, a German painter and photographer. Polke used the double exposure technique to produce this piece of work. The use of close-ups directs the viewers attention to the details that fascinated Polke the most, which in this case are the arch on the faucets as in the image. He placed two negatives in the enlarger to introduce context and texture into the final layered photograph. In this photograph, Polke used  two gleaming faucets among people carrying umbrellas as they move through the flooded street. The link between the faucets and the flooded street have a thing in common as they both use water in some way. It's a very clever use of the two and at first glance, one may not see the connection or what the photograph actually consists of.

 I choose to look at this photograph as it was the one which stood to me the most. It sparked many questions in my mind as to what exactly the image was and how it was done. I really like the subliminal meaning of the faucets and the photograph of the people with the umbrella, however I hoped the photograph could have better clarity  however given the time it was taken it is very understandable. 
This type of work reminds me of works done by Stephanie de Rouge a French photographer based in New York.

This is one Stephanie's pieces of work, in my opinion it bears resemblance to that of Polke's because at first glance the photograph seems too busy and like some sort of code which you need to decipher. Although her work is a bit more abstract, it still manages to catch that chaotic side as that of Sigmar Polke's.

Monday 22 April 2013

REVIEW OF IDEAS

My starting point for my exam was looking at fake papparazzi and looking at Ron Gallela's work as a massive inspiration. At first I thought it was a good starting point and related quite well to the theme however I didn't find it very interesting and I began to think of different ideas which were a bit more exciting. 


I then began to do some work in the style of Sally Mann. I really liked how contraversial her photographs were and how they sparked different feelings and emotions on the viewer. I took some images of my younger brother and painted his face to look like bruises. This worked really well and I was pleased with the outcome, however I was short on children to photograph and thought they would become quite repetitive if I kept taking photographs of my little brother. 

Since then my ideas have changed due to an image I saw on getty images which had a fingerprint covering a mans face. This then sparked different ideas such as hidden identity, obscuring faces etc. I then thought of criminals because of the photograph and began to really like that area for doing some photography so I looked at a photograph called Melanie Pullen, who did high fashion crime scenes. Although I was going for something less glamourous the basic premise about how she composed her models and how she made it look like a crime scene which I found inspiring for my final piece.

I found that one of my most successful experiments was with the paper cutting. Both in the dark room and outside. This is one example I did in the dark room, were I cut different stripes of photographic paper and stuck it down on another piece of paper. This worked very well in giving the image more texture and also different levels.

This is another variation of the top image. After achieve the desired look, I went on top of it with more digital cut-outs. This helped to add colour to the photograph and give it a more 'modern' look. I also liked the idea that I can always scan in an image I've done in the darkroom and alter it digitally using photoshop.

An experiment which didn't work as well was the solarisation. It is quite difficult to get the perfect image. I think it didn't work as well because I wasn't as careful as I should have been. When I was moving from my workstation to the stop I was moving too quickly and the water began to run across the the paper creating this effect.
An experiment which I would like to develop further is the paper cutting and the mixing of different medias. I may get my darkroom experiments, scan them in and experiment using Photoshop and programs like that.

At the beginning I mainly looked at Sally Mann and Ron Gallela  However as of recent, I have been looking at Nina Chakrabrati and and the detail that she does on the faces of her photographs. This type of work is something that I may experiment with for my final outcome.


Saturday 6 April 2013

PHOTO COLLAGES

Paper Collage


For my first collage I choose this image which I took of my friend through a glass window. I then tour pieces of paper with different sayings in them. The first piece of paper says: "She didn't stop" and then second says: " Hide yourself from the world. Don't show your true emotions. Don't let them see you crumble. Rise above it all". I choose to write these as it is a sort of personal meaning to me and other people. I was trying to look at how many teenagers these days see themselves and how many have different problems and they choose not to show it. It's a basic concept but with a lot of personal meaning.


My second collage is again looking at teenagers and i wrote on it: "Society killed the teenager". Which basically means that society's views on what it perfect and acceptable has been distorted to this image which many teenagers aspire to be, and it's ridiculous as many go to extreme lengths to look the way society tells them to look. I added the coloured paint and dripped it down the photograph to get this distorted and messy look. I choose the colours red, white and black because, the white shows the purity of the teenager, the black is society and the red is all the life's that have been lost at trying to have this perfect image. The dripped method worked really well as it merged all the colours together creating this sense of confusion and chaos, which was what I was trying to achieve.


My third collage image is of a double exposure which I did, which came out with this ghostly effect and then I cut into it with a scalpel. I cut out random different sections of the photograph and then I got white tissue paper, scrunched it and made a sort of border around the edges of the photograph. This collage had no meaning, I merely did what I thought would look okay and I think this didn't come out too bad, I really like the ghostly effect of the photograph and I think it goes well with the tissue paper.

Digital Collage

For my first digital experiment I did this one inspired by Vasilisa Forbes. Since I cant access Photoshop at home I used a simple photo editor online to create this. I just choose basic geometric shapes, in this case rectangles. And placed them around the image. I then faded them a little to make them see through like Forbes's. I think this technique works best on black and white photographs as you can have different coloured shapes and it makes them stand out a lot more.


For my second digital experiment I used this photograph of a man on his phone, which I took when I went up to London. Again using the same photo editor I made the made the image black and white which again I think helps the cut outs to stand out more if they are against a neutral background. I then found these different papers on the actual site and put those onto the photograph and then wrote on them with the text option that the site provides. It also has another option in which you can overlay another photograph, so I did so with the love letter on the bottom left. I just googled love letters and found that one and overlaid it on top and then again faded the image a little for the see through affect. I then just added another plain rectangle in the bottom corner to finish off the look. I took inspiration from Emidio Bernadrdone who uses simple cut outs of various different papers and overlays them on top of each other.


For my final digital collage I did this piece inspired by an artist I found on my pinterest named April Deacon. I find her work very beautiful and very creative and I tried my best to somewhat recreate that digitally. I choose this photograph of my niece which I had taken earlier in the month. Using the same photo editor I choose the basic geometric shapes and began to place them all around her face, I used bigger circles for larger areas of the face and then smaller circles for a little detail. It took a while to do and it did get a little tedious so it is definitely not the best it can be and also if I had been using a better editing system it would also help, but for an experiment I thought it worked really well. I really like this technique and it is one I may consider to do further, although I think doing it by hand may make it a lot easier. 

JUERGEN TELLER INSPIRED

These are my Juergen Teller inspired photographs. I just took some random photographs of my family and then edited them slightly. I really like Teller's quirky and weird style so taking these were really fun.

BEFORE
AFTER
The wining wink.
Sweet o' child of mine

BEFORE
AFTER
Can't keep it in.

BEFORE
AFTER
I can see what you had for breakfast.

BEFORE
AFTER
And,squeeze!
BEFORE
AFTER
The two stooges.
BEFORE
AFTER
I'm blue.
BEFORE
AFTER
Solvent abuse can kill.
BEFORE
AFTER
Lost children.
I also made a simple gif, on gif pal.

DARKROOM EXPERIEMENTS


This is one of the photographs which I took using my film SLR. The original photograph came out really well in my opinion, it was well contrasted and had a crisp white background which was what I was going for. I used completely natural lighting which I was a bit skeptical at first but in the end result it came out better than expected. To develop the image one step further, in the dark room I got a piece of photographic paper and cut out different stripes and stuck it on another piece of photographic paper, I then exposed it as normal. I really like this technique and I think it worked really well, in order to further develop this idea I could use different shapes and even different levels of paper and see how that does.


This another development from the photograph above. I tried to do a solarisation, which I did by getting photographic paper and dunking it in the developer and then expose the photograph and put it in the stop. It didn't come out quite as I had hoped, as when I was moving the photograph to the stop the developer began to drip down the paper. I actually kind of liked how it turned out, even though it didn't turn out quite like I had hoped.


This is the original photograph before any experimenting. I took it through a window, I choose to use this window as I thought it had some good texture to it with all the grid pattern and I also liked the rain droplets on it. I tried to focus the camera more on the window rather than figure to give it that selective focusing effect. The photograph although it a little too dark I think that was due to either, the lighting, which as natural however it was overcast which didn't help; or it could have been that it didn't have the correct light settings.


This is the selective painting development. Since the photograph was too dark, I thought I could use selective painting to only develop certain areas of the photograph. I did this by exposing the photograph and then with a paint brush, I would dip it into the developer and brush it on the paper. I thought this technique    really helped make the image a little lighter and also it gave it a really different and interesting effect.


For this photograph I did selective masking. To achieve this I first had to know all the settings and times for each of the photographs. Once I knew this i exposed the first photograph covering the rest of the paper with black card. I then marked off where I exposed the photograph and then covered it. I then exposed the next image and repeated the process. I didn't know if it would come out and I was surprised when it did. Since I didn't know if it would work or not I wasn't sure how much of the photograph I should expose so it became a little more rushed. However this could be an experiment which I could take further and expose different photographs.


This photograph was one inspired by Ron Gallela in that it has the 'paparazzi' feel to it. I took this photograph from another side of a fence and asked my friend to look back as she walked as if she felt she was being watched. Again the photograph came out a little too dark due to the lighting but in this case I think it works for the mood of the photograph. It creates some sense of mystery and has that eerie feel about it.


This is another paparazzi like photograph which I made into a double exposure by sandwiching two negatives together. Instead of using two different negatives, I used two which were relatively similar to each other which gave it that ghostly feel. The photograph due to it being sandwiched together came out very light and so I had to make the aperture smaller in order to get the photograph as dark as it would go and this is the end result.


Using the same double exposure I tried to a reversal. Whilst the photograph was being exposed I moved the paper which gave it that sense of movement, adding to the ghostly feel in the previous photograph. I like how the photograph starts off being dark towards the end and gradually gets lighter as you go to towards the top. 


DIGITAL EXPERIMENTS

Contact Sheets:


Digital Experimentation:


This image was one I took just after we had a little rain. I got behind a group of tourists and took the photograph of their shadows. I also wanted to get their feet in the photograph as I thought it still kept that theme of obscured but yet it still revealed a small part of that person. I edited the photograph in using Photoshop, adjusting the brightness and contrast and giving the photograph this blue tone. I really liked the way it looks and its a different take on the classic black and white and also adds to that 'cold' atmosphere of busy London streets.
This photograph is a portrait of a man who I found rather dapper in his trench coat and on his phone. The way he was standing also seemed posed, however that as not the case. I managed to capture him in his natural sate without him realizing, which thinking now I am not sure how he didn't see me but I think that was the fun of it. Again I edited the photograph in Photoshop and again went for that coloured look, only this time I choose a more greenish tint. I also played with the brightness and contrast so it didn't look too off.


For this photograph I was looking down on people from Trafalgar Square and photographing them, sort of like 'spying'. I got behind the wall and photographed in between the bits you could see out off and focused my camera on the actual instead of the people. I really liked this effect and it was extremely easy to achieve and in my opinion quite successful. I only done some slight editing to this image by making it a little more sharper and brighter.


This is a really sweet photograph of an old couple, which I couldn't resist not taking a photograph of. I applied the same technique as I did for the photograph above but instead I photographed it in landscape. Since my camera was on auto-focus I couldn't get certain part of the photograph out of focus, so I did this using Photoshop. I drew a circle around the couple, then feathered it out so it didn't look too perfect, then inverted this, and then I applied gaussian blur to achieve this effect.